1. Redux 란?

Redux 는 javascript 상태 관리 라이브러리 이다. 또한 Redux 는 앱 내에 여러 데이터들의 상태를 저장하는 저장소이다.
React 는 기본적으로 하위 컴포넌트들에 props 를 넘겨주는 3가지 방법이 있다. 첫번째는 props에 담아서 넘겨주는 것이고, 두번째는 context api 를 활용하는 것이다. 그리고 마지막으로 Redux 를 통해 모든 컴포넌트들에서 공통 store 에서 값을 참조 할 수 있게 하는 것이다. 리덕스 공식 홈페이지에서는 Redux 를 예측 가능한 상태 컨테이너라고 표현한다. 즉 어떤 값을 넣고 어떤 값이 도출 되는지 예측이 가능하다는 말이다.
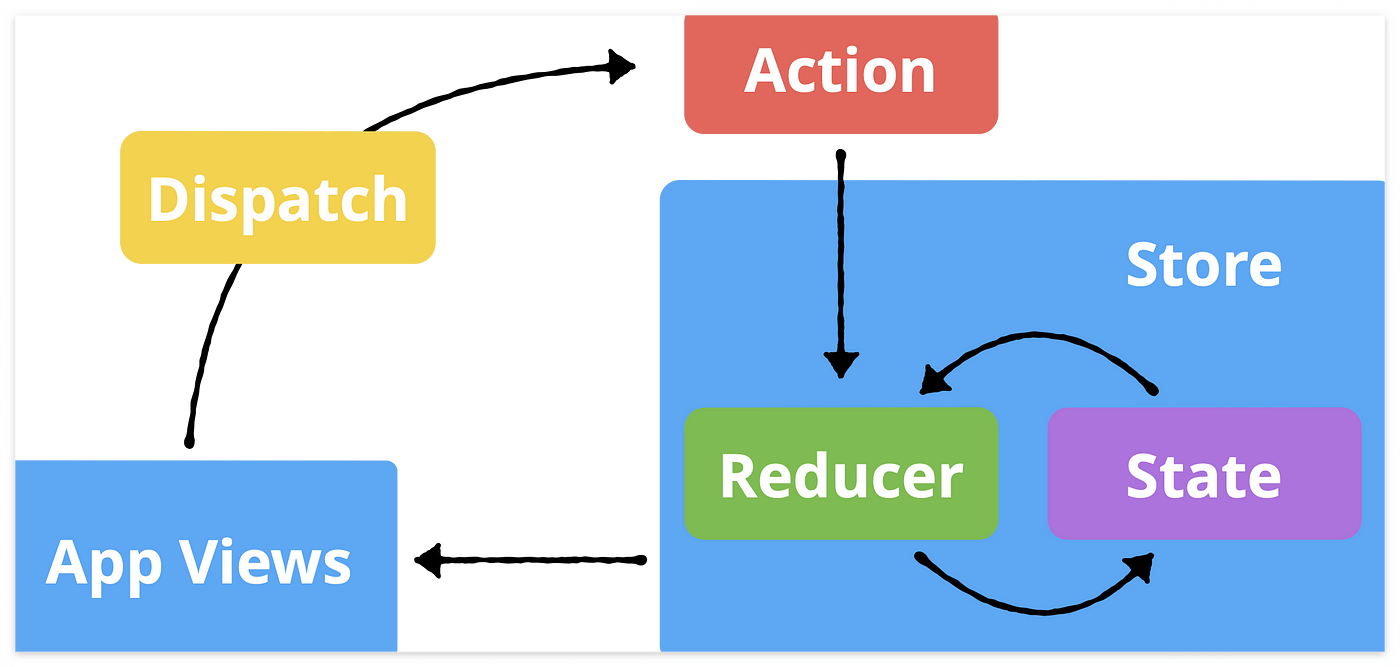
위는 리덕스의 구조이다.
앱 화면에서 Dispatch 를 통해 Action 을 발생시킨다. 그러면 Reducer 에서 발생된 Action 을 읽고 해당 Action에 맞는 로직을 실행시켜 변화된 데이터의 상태값을 Store 에 반영하여 최신화 시킨다.
이론은 상기와 같고 실습을 통해서 redux 를 적용해보자.
redux 기본 세팅 결과물 github : https://github.com/bumrei/redux-practice-react/tree/redux_basic_setting
GitHub - bumrei/redux-practice-react: This is the repository for the redux setting and using practice.
This is the repository for the redux setting and using practice. - GitHub - bumrei/redux-practice-react: This is the repository for the redux setting and using practice.
github.com
브랜치 : redux_basic_setting
2. Redux reducer, store 구성해보기
1.) 먼저 설치
- react-redux, redux, redux-actions 설치를 진행해준다.
2.) 폴더 구성
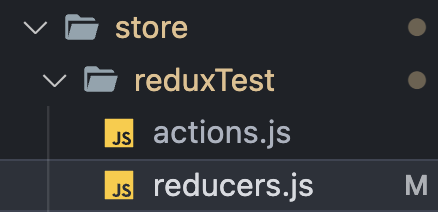
- src/store/reduxTest 폴더 생성 후 그 아래 actions.js, reducers.js 생성해준다.
- 그다음 reducers.js 안에 initialState 구성.
initialState 를 구성하고 forTheTest reducer 로직을 구성해준다.
// src/store/reduxTest/reducers.js

import { fromJS } from "immutable";
import { handleActions } from "redux-actions";

const initialState = fromJS({
    data1: '테스트',
    data2: '이게 개발자 툴에서 보이면 성공.',
})

const forTheTest = handleActions(
    {},
    initialState
);

export default forTheTest;
3.) src/store/index.js 에 reducer 설정 파일 구성
- src/store/index.js 생성
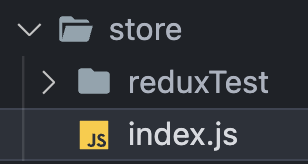
- combineReducers() 를 통해 rootReducer 생성.
rootReducer 에 위에서 구성한 forTheTest reducer 등록.
// src/store/index.js

import { combineReducers } from "redux";
import forTheTest from "./reduxTest/reducers";

const rootReducer = combineReducers({
    forTheTest,
})

export default rootReducer;
4.) src/index.js 에서 store 세팅
- configureStore() 로 전역으로 사용할 store 구성.
- configureStore() 에 rootReducer 를 reducer 로 등록해준다.
- react-redux 라이브러리에 <Provider /> 컴포넌트로 앱의 가장 최상위 부모컴포넌트를 감싸주고 store 를 props 로 넣어준다.
// src/index.js

const store = configureStore({
  reducer: rootReducer,
})

const root = ReactDOM.createRoot(document.getElementById('root'));
root.render(
  <React.StrictMode>
    <Provider store={store}>
      <BrowserRouter>
        <RouterHome />
      </BrowserRouter>
    </Provider>
  </React.StrictMode>
);
5.) 첫번째 reducer 가 정상 등록됐는지 확인.
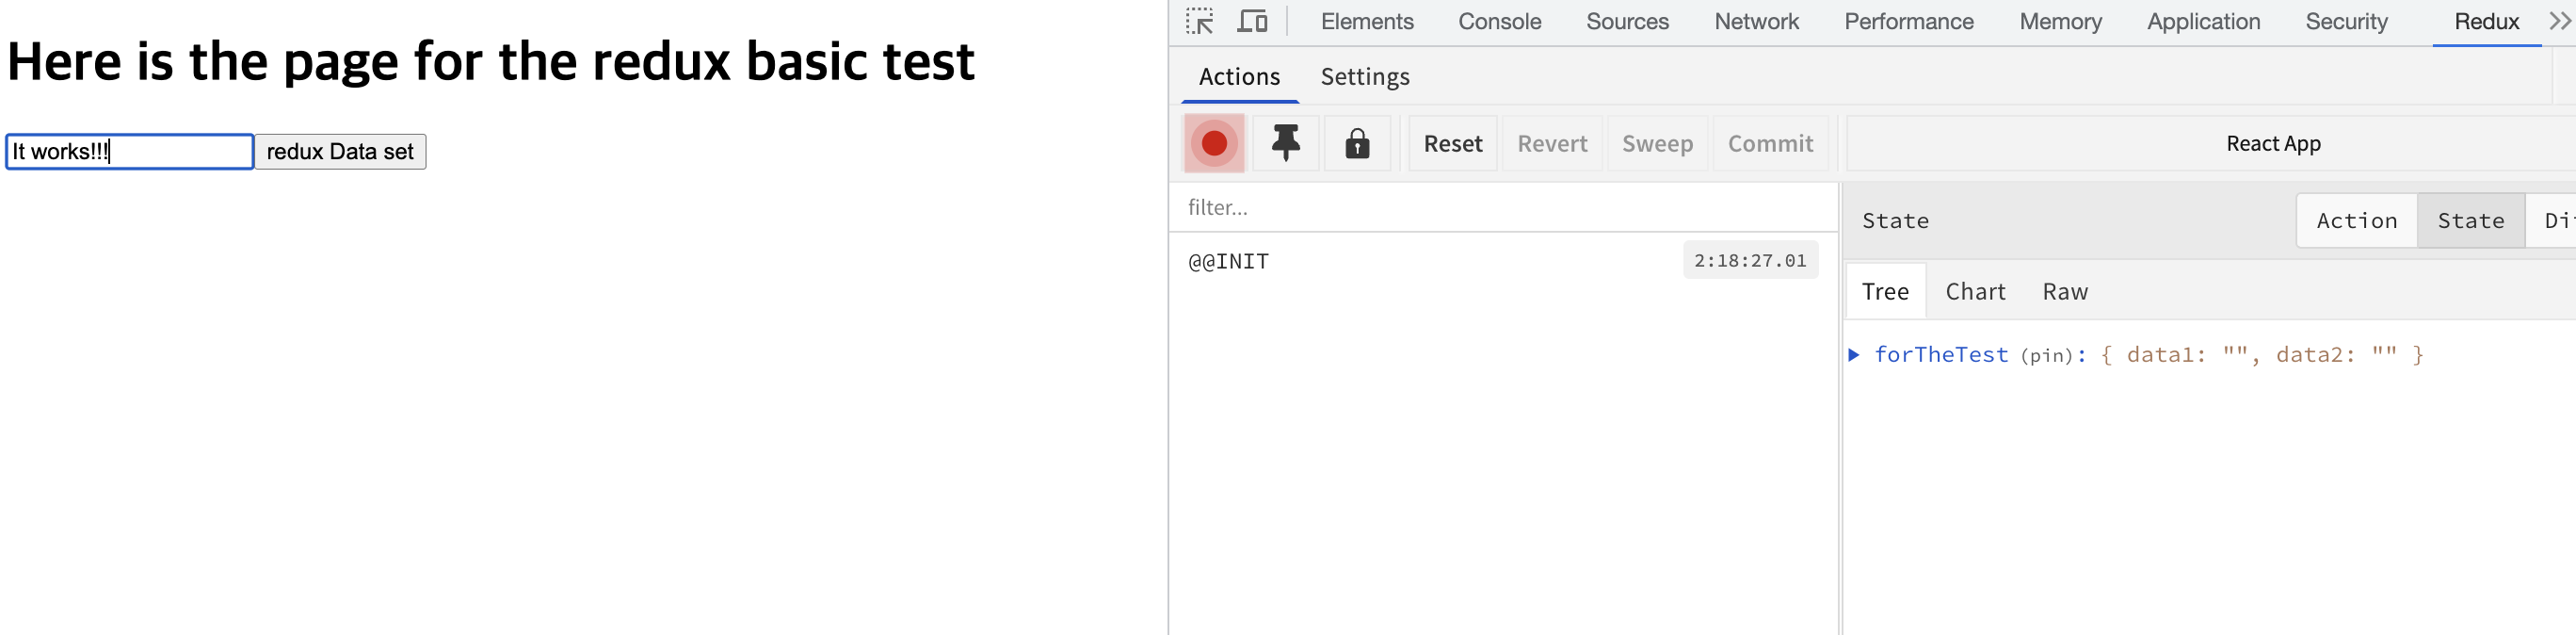
- chrome 개발자 도구 redux 파트에서 첫번째로 등록한 reducer 에 initialState 가 store에 잘 올라갔는지 확인.
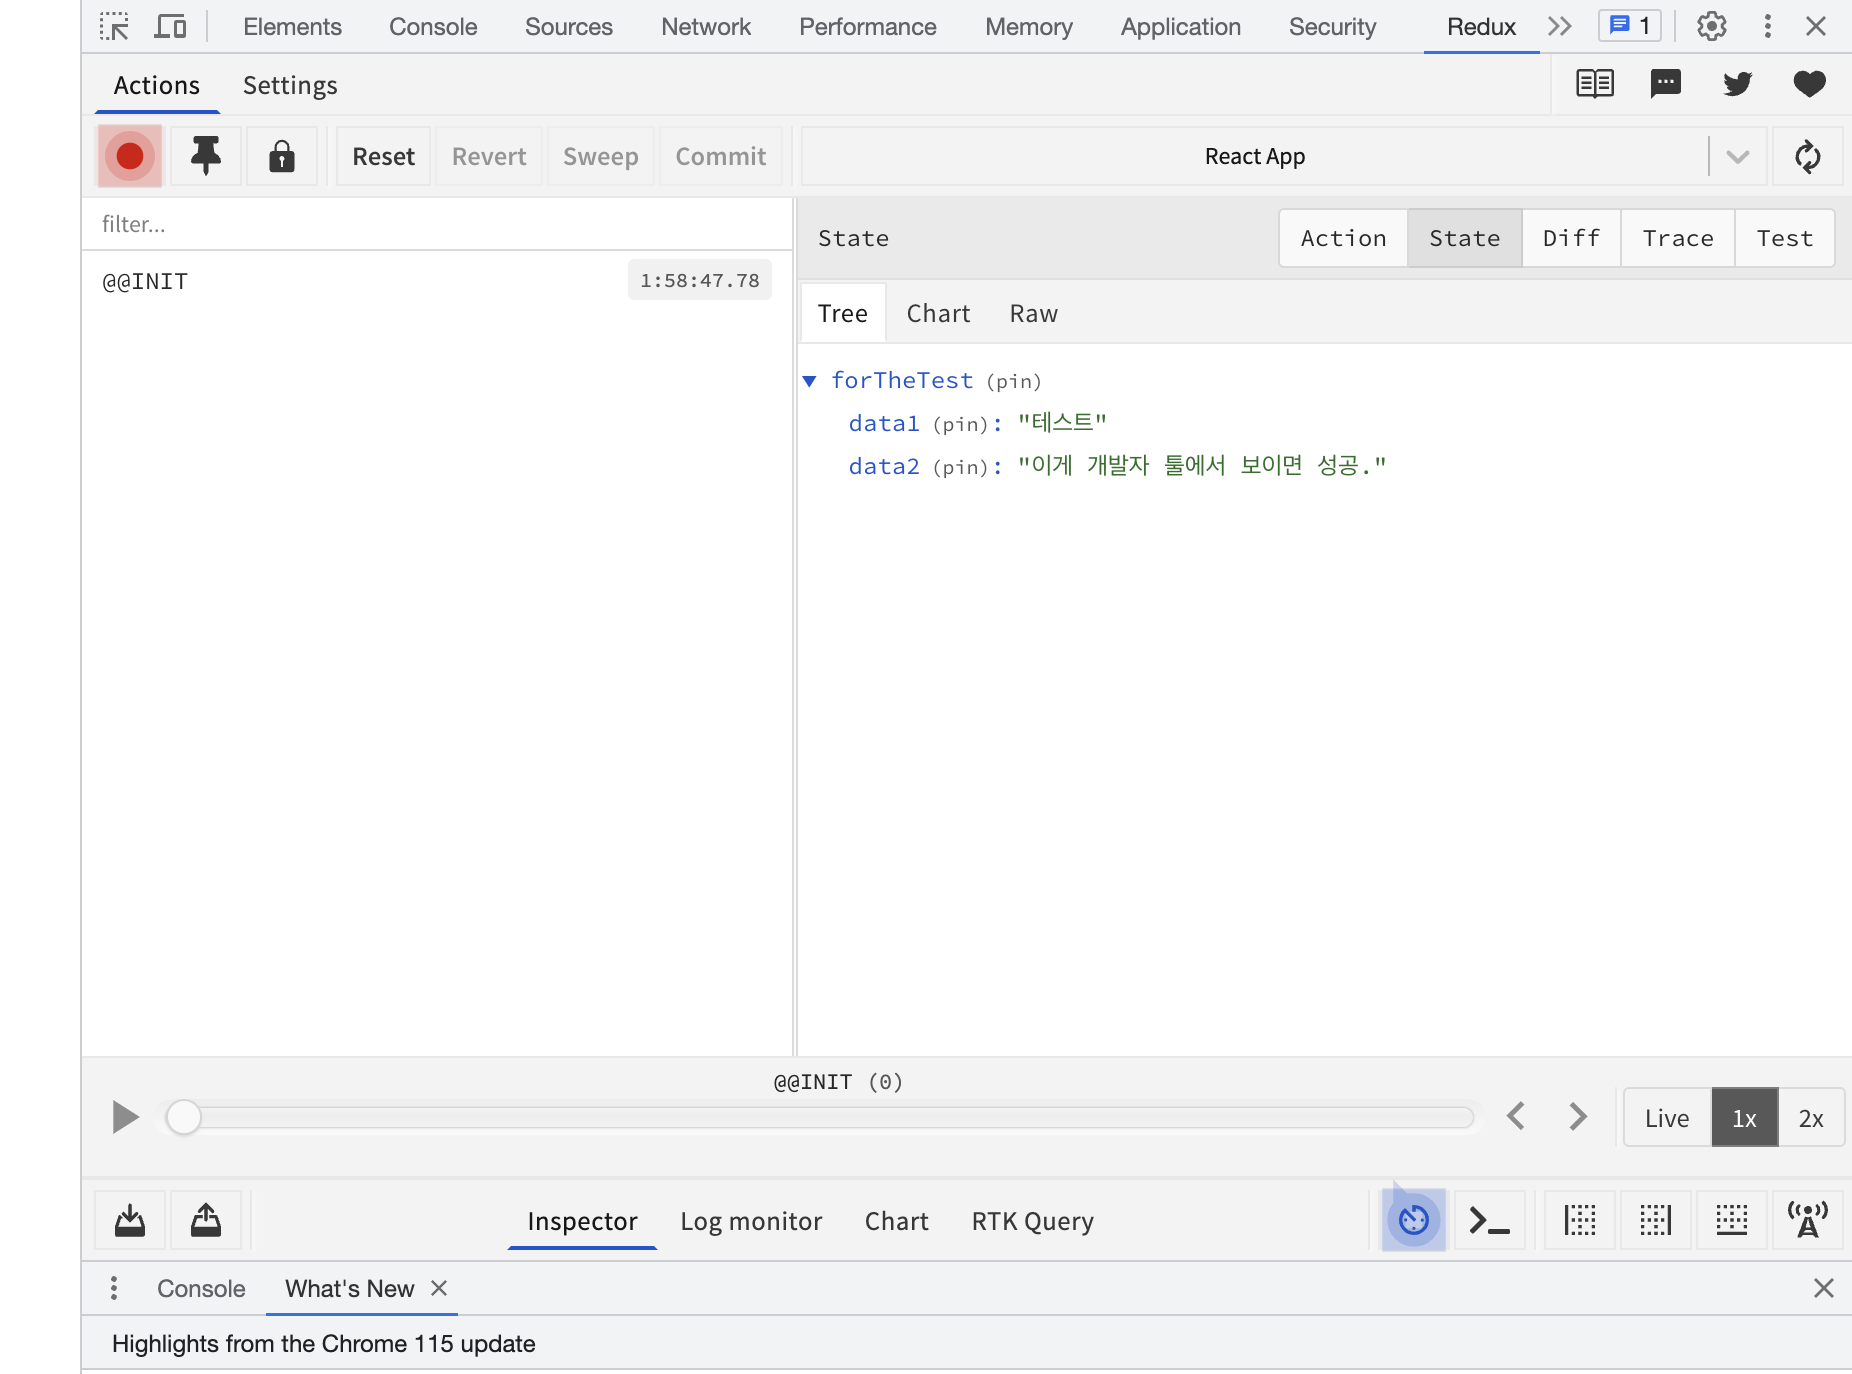
성공.
3. Redux actions 적용 및 앱 실행
redux-actions 라이브러리에 createAction 을 통해 action 을 만들고 이 action 을 dispatch 하여 store 에 상태값을 변화시켜보자.
1.) actions.js 구성
- 위에서 만들었던 store/reduxTest/actions.js 에서 action 을 구성해보자.
import { createAction } from "redux-actions";

export const WRITE_ANY = 'haTest/WRITE_ANY';

export const writeAny = createAction(WRITE_ANY, (value) => ({value}))
2.) reducer 에 action 등록.
- src/store/reduxTest/reducers.js 에 action 을 아래와 같이 등록해준다.
import { fromJS } from "immutable";
import { handleActions } from "redux-actions";
import { WRITE_ANY } from "./actions";

const initialState = fromJS({
    data1: '',
    data2: '',
})

const forTheTest = handleActions(
    {
        [WRITE_ANY]: (state, action) => {
            const {value} = action.payload;
            return state.set('data1', value);
        }
    },
    initialState
);

export default forTheTest;
3.) src/page/ReduxTestPage.js 컴포넌트 생성 후 구성.
- 필자는 Router 를 사용했고 Router 에 <ReduxTestPage /> 컴포넌트를 등록해준 상태이다.
- Router 구성을 원치 않으면 src/index.js 에서 <Provider> 컴포넌트 안에 <ReduxTestPage /> 컴포넌트 하나만 넣어주면 된다.
// src/page/ReduxTestPage.js

import React, { useState } from 'react';
import { useDispatch, useSelector } from 'react-redux';
import * as reduxTest from '../store/reduxTest/actions';

const ReduxBasicTest = () => {
    const dispatch = useDispatch();
    const [content, setContent] = useState('');
    const result = useSelector((state) => state.forTheTest);

    const handleRedux = () => {
        dispatch(reduxTest.writeAny(content));
        setContent('');
    }

    return (
        <div>
            <h1>Here is the page for the redux basic test</h1>
            <input onChange={(e) => setContent(e.target.value)} value={content} />
            <button type='button' onClick={handleRedux}>redux Data set</button>
            <h2>{result.getIn(['data1'])}</h2>
        </div>
    );
};

export default ReduxBasicTest;
위 코드에서 주목할 점은 useDispatch() 와 useSelector 이다.
간단하게 useDispatch 로 구성된 dispatch 는 action 을 발생시키는 역할, useSelector 는 store 에 저장되어있는 상태값을 컴포넌트에서 사용하기 위해 가져오는 역할을 한다.
그렇게 가져온 데이터를 result 에 담아서 <h2> 태그로 표출해준다.
4. ) 정상 작동 확인.
yarn start 로 실행 후 화면 진입.
아무글이나 입력후 [redux Data set] 버튼 클릭.

action 이 잘 발생하고 Redux store 에 잘 들어가고 useSelector 로 store 에서 가져온 데이터가 h2 태그로 잘 표현되는것을 확인하면 성공이다.
Redux 적용 완료.
5. ) 완벽하지 않은 적용... non-serializable 직렬화 오류 발생
하지만 계속 Text 를 입력하고 버튼을 클릭시 개발자툴에 Console 쪽에서 아래와같이 non-serializable 에러가 발생하는것을 볼수 있다.

위 오류는 우리가 store에 넣을 reducer 에 initialState 를 좀더 효율적으로 관리하기 위해 사용한 immutable 이라는 라이브러리 때문에 JSON 형태 변환 과정에서 오류가 발생한 것이다.
위 오류는 아래 글에서 좀더 자세히 알아보도록 하자.
https://dennycode.tistory.com/89
[React Redux] Redux 적용중 발생한 A non-serializable value was detected 오류
열심히 React 에 Redux 를 구축을 완료했는데 테스트를 해보는 과정에서 A non-serializable value was detected... 오류가 발생하였다. 이건 도대체 무엇인가. 위 오류를 해석해보면 바로 "직렬화 할수 없는 값
dennycode.tistory.com
위 글을 통해 상기 오류가 직렬화가 불가능한 타입 사용으로 발생한 문제라는 것을 생각해야 한다.
우리가 initialState 에서 사용한 immutable 이라는 라이브러리에 fromJS() 는 console.log() 로 찍어서 데이터를 확인해보면 일반 객체가 아닌 Map 타입의 객체라는 것을 확인 할 수 있다. 즉 JSON 형태로 직렬화가 불가능한 타입이다. 그렇기 때문에 redux store 에 값을 담는 과정에서 오류가 발생하는 것이다.
우리는 이 문제를 createSerializableStateInvariantMiddleware() 라는 함수를 통해 생성한 Middleware를 적용함으로써 해결할 것이다.
6.) non-serializable 직렬화 오류 해결
상기 오류를 해결하기 위해 redux-toolkit 공식 사이트를 참고하였다.
src/index.js 에서 아래와 같이 Serializable Middleware 를 구성하여 configureStore() 에 Middleware 로 등록하였다.
// src/index.js

import React from 'react';
import ReactDOM from 'react-dom/client';
import { BrowserRouter } from 'react-router-dom';
import RouterHome from './routes/RouterHome';
import { configureStore, createSerializableStateInvariantMiddleware, isPlain } from '@reduxjs/toolkit';
import rootReducer from './store';
import { Provider } from 'react-redux';
import { Iterable } from "immutable";

const isSerializable = (value) => {
  return Iterable.isIterable(value) || isPlain(value)
}

const getEntries = (value) =>
  Iterable.isIterable(value) ? value.entries() : Object.entries(value)

/**
 * https://redux-toolkit.js.org/api/serializabilityMiddleware 참고.
 */
const serializableMiddleware = createSerializableStateInvariantMiddleware({
  isSerializable,
  getEntries,
})

const store = configureStore({
  reducer: rootReducer,
  middleware: [serializableMiddleware],
})

const root = ReactDOM.createRoot(document.getElementById('root'));
root.render(
  <React.StrictMode>
    <Provider store={store}>
      <BrowserRouter>
        <RouterHome />
      </BrowserRouter>
    </Provider>
  </React.StrictMode>
);
상기 Middleware 를 store 에 action 발생시 해당 action 타입에 payload 가 직렬화가 가능한지 아닌지를 판단하고 직렬화가 불가능한 타입의 경우 직렬화가 가능한 타입으로 변환하여 store에 값을 저장하는 형태 같다. 위 middleware에 대해선 좀더 연구한 후 따로 글을 작성할 예정이다.
상기 Middleware 를 적용해주면 깔끔하게 위 직렬화 오류가 사라지는 것을 확인할 수 있다.

References
"state.set is not a function" as part of my react-redux-immutable learning curve
The Action creator is getting called twice, it works just fine on the first case but not working as expected on the second call. at first time. This is happening consistently on the second call. W...
stackoverflow.com
- https://redux-toolkit.js.org/api/serializabilityMiddleware
Serializability Middleware | Redux Toolkit
redux-toolkit.js.org
'React > Redux - React' 카테고리의 다른 글
| [React Redux] Redux-Saga 사용하기 (Starwars api 활용 테스트) (0) | 2023.08.13 |
|---|---|
| [React Redux] store에 reducer 여러개 등록하여 사용하기. (0) | 2023.08.06 |
| [React Redux] Redux 적용중 발생한 A non-serializable value was detected 오류 (0) | 2023.08.06 |


